
Loading...
Loading...
Loading...
Loading...
Loading...
Loading...
Loading...
Loading...
Loading...
Loading...
Loading...
Loading...
Loading...
Loading...
Loading...
Loading...
Loading...
JFrog Connect REST API v2
The JFrog Connect API v2 enables programmatic access to and control of Connect’s basic functions, which is ideal for managing your devices. The automation capabilities that the REST API provides are crucial for the management of accounts with a large number of edge devices.
The API enables you to embed Connect functionality into your CI/CD pipeline and to deploy over-the-air updates as part of new application releases. You can also use the API to create a custom dashboard or integrate Connect information with an existing dashboard.
The v2 API has API requests that enable you to get information about your devices, update device information, add tags to devices, and create and deploy software update flows.
You will need to get an access token from the Connect web UI to use the Connect API v2. The v1 token will not work for v2.
If you are using the old web UI, see .
If you are using the new UI, see .
Important: For security reasons, the new token generated by Connect will not be stored. Ensure that you copy the token and save it in a safe place.
In the Connect API v2, the URLs have the form:
{{base_url}}/api/v2/...
For example, a URL for Get Device, using "demo" as project_key and "d-feaf-d9aa" as device_uuid would be:
{{base_url}}/api/v2/demo/devices/d-feaf-d9aa
If you are a cloud user of Connect (i.e., multi-tenant SaaS), the base_url is:
https://api.connect.jfrog.io
So an example of the full URL for the above request would be:
https://api.connect.jfrog.io/api/v2/demo/devices/d-feaf-d9aa
This is the base URL used throughout the API reference documentation.
Learn how to get an access token for using the API: ,
JFrog Connect API requests that deploy software, retrieve information about deployments, or abort deployments.
JFrog Connect API requests for creating and managing update flows.
JFrog Connect API requests that act on the edge device or retrieve information from one or more devices.
When deploying OTA updates on devices, there are situations when your device state is not compatible with receiving new updates. If, for instance, your device is currently in use by the end-user, you would rather not deploy the new update at that time. Using the Update Trigger call, you can manage from within your application when you would like to receive updates, and when not to.
After setting the update trigger, your device will not receive new updates until you unset the trigger.
The Update Trigger for a specific device can also be set through the JFrog Connect Web GUI, through the device details box when selecting it on the Devices page.
POST https://api.connect.jfrog.io/v1/set_update_triggeruser_token*
string
This is your account token. Can be found under the Settings category on Connect dashboard.
device_token*
string
This is your device token.
trigger_set
boolean
Set to true to NOT receive new updates. Set to false to receive new updates
{"message": "Success"}{"error_message": "<ERROR_MESSAGE>"}{}import json
import requests
#Upswift tokens
user_token = "<user token>"
device_token = "<device token>"
json_content = {'user_token': user_token,
'device_token'
JFrog Connect API requests to support port tunneling.
This page has requests to support port tunneling, such as opening and closing port tunneling sessions, and has requests to get information about the open port tunnels.
The following are required to use the port tunneling API requests:
You must have the following Project Permission defined:
Remote Terminal & Port Tunnel.
For using a remote SSH session, you need ssh-client installed on the device.
No ports need to be open on the device or the firewall for port tunneling to work.
JFrog Connect API request to retrieve files and folders (such as logs) from devices.
The device_tags endpoint is only used for the deletion of tags.
If you would like to add a tag to your device via our Rest API, see Change devices details.
DELETE https://api.connect.jfrog.io/v1/device_tags
Using this call, you can delete a tag from devices.
Possible types and values:
device_filter object:
filters key:
Possible values for the
All values must be of type: String.
Full payload example:
You need an access token to use the JFrog Connect API. This page describes how to get tokens for Connect API v2.
For the JFrog Connect API v2, there are two types of access tokens, User (also called ) and Custom (also called scoped tokens). This increases the system security by enabling you to construct an access token that is very specific to the permissions allowed.
The tokens you create in Connect are valid only in Connect. However, if you create an admin token in Artifactory, you can use it in the Connect API v2.
Important: Use this page only if you have the old web UI. If you have the new UI, use .
You need an access token to use the JFrog Connect API. This page describes how to get tokens for Connect API v2 and is for users with the new web UI.
Each device can send up to three API calls in a minute. If you reach the limit, you will receive an appropriate response code. Please check the response codes and send no more calls than the limit. Otherwise, your device may get banned for API calls.
All calls require a user_token and some of them require a device_token.
Token retrievals might have slight differences between agent versions. We strongly recommend upgrading the Agent to the latest version available.
typespecific_device - Set this value if you want to filter one specific device. The value of the value key of this type is the ID of the device you want to filter (you can obtain the id on Connect dashboard). The possible operand key values for this type are: is, is_not
tag - Set this value if you want to filter devices by a tag. The value of the value key of this type is the name of the tag you want to filter (you can obtain the tag name on Connect dashboard). The possible operand key values for this type are: is, is_not
app - Set this value if you want to filter devices by the apps that are set to them. The value of the value key of this type is the app name. The possible operand key values for this type are: is, is_not.
device_state - Set this value if you want to filter devices by their state. The possible values of the value key of this type are: online, offline. The possible operand key value of this type is: is
update_status - Set this value if you want to filter devices by their last update status. The possible values of the value key of this type are: pending, in_progress, success, failed, aborted. The possible operand key value of this type is: is, is_not
tag_name*
string
The tag name you want to delete A tag with that name must exist.
user_token*
string
This is your account token. Can be found under the Settings category on Connect dashboard.
device_filter
object
A JSON object with the filter you would like to apply on your devices fleet. This filter will be applied and the result will be the devices that receive this update. The object has multiple keys:
1. "project": {"name": "<project_name>"} set the <project_name> as your project name from Connect dashboard. The project key must exist and the value of it is a JSON with the key name.
2. "groups": [{"name": "<group_name>"}] set the <group_name> as a group name from Connect dashboard. The groups key is a must key but the value of it can be an empty list. The value of it is a list of JSON objects each has a key called name. If multiple groups exist, all devices within those groups will receive the update.
3. "filters": [{"type": "<filter_type>", "operand": "<operand>", "value": "<value>"}] the filters key lets you add custom filters. Set the <type> key as the type of the filter (possible types can be found under this form). Set the <operand> key as the operand for this filter (possible operands can be found under this form). Set the <value> key as the value for this filter (the value depends on the type of the filter, examples can be found under this form).
You can set multiple filters, if you do so, they will all be applied on top of each other (examples can be found under this form). The filters key is a must key but the value of it can be an empty list.
{"error_message": "<ERROR_MESSAGE>"}{}{"message": "Success"}{
"user_token": "<user token>",
"tag_name": "some-tag-name",
"device_filter": {"project": {"name": "Demo"},
"groups": [{"name": "TestGroup1"}, {"name": "TestGroup2"}],
"filters": [{"type": "specific_device",
"operand": "is",
"value": "d-4ec7-1be9"}]},
}import json
import requests
#Upswift tokens
user_token = "<user token>"
json_content = {'user_token': user_token,
'tag_name': 'some-name',
'device_filter': {'project': {'name': 'Demo'},
'groups': [{'name': 'TestGroup1'}, {'name': 'TestGroup2'}],
'filters': [{'type': 'specific_device',
'operand': 'is',
'value': 'd-4ec7-1be9'}]}
}
call_request = requests.delete("https://api.connect.jfrog.io/v1/device_tags", json=json_content)
call_response = json.loads(call_request.text)
if call_request.status_code != 200:
if call_request.status_code == 429:
error = "API limit reached"
else:
error = call_response["error_message"]
print(error)
else:
response_message = call_response["message"]
app_name*
string
The app name you want to delete An app with that name must exist.
user_token*
string
This is your account token. Can be found under the Settings category on Connect dashboard.
device_filter
object
A JSON object with the filter you would like to apply on your devices fleet. This filter will be applied and the result will be the devices that receive this update. The object has multiple keys:
1. "project": {"name": "<project_name>"} set the <project_name> as your project name from Connect dashboard. The project key must exist and the value of it is a JSON with the key name.
2. "groups": [{"name": "<group_name>"}] set the <group_name> as a group name from Connect dashboard. The groups key is a must key but the value of it can be an empty list. The value of it is a list of JSON objects each has a key called name
{"message": "Success"}{"error_message": "<ERROR_MESSAGE>"}{}Possible types and values:
device_filter object:
filters key:
Possible values for the type key:
specific_device - Set this value if you want to filter one specific device. The value of the value key of this type is the ID of the device you want to filter (you can obtain the id on Connect dashboard). The possible operand key values for this type are: is, is_not
tag - Set this value if you want to filter devices by a tag. The value of the value
All values must be of type: String.
Full payload example:
apps
array
A list of JSON objects that include the apps and their versions that you want to modify: [{"app_name":"<name>", "version": "<version>"}] Set the <name> as the name of the app (must exist in Connect dashboard) and set the <version> as the version for that app.
tag
string
A tag to add to the device.
user_token*
string
This is your account token. Can be found under the Settings category on Connect dashboard.
device_token*
string
This is your device token.
{"message": "Success"}{"error_message": "<ERROR_MESSAGE>"}{}Example
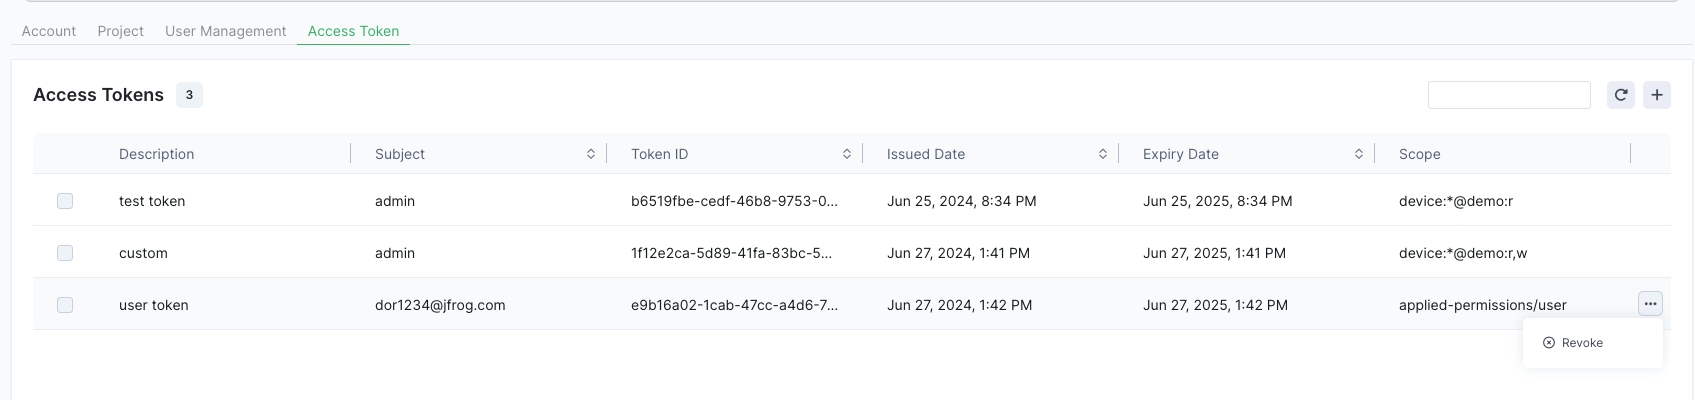
In the Connect Settings, the Access Tokens tab shows a listing and brief description of the access tokens created in your account.
The Access Tokens table includes the following information in the columns:
Description: One or more words indicating what the token is for.
Subject: The user for whom the token was created.
Token ID: The UUID of the token.
Issued Date: The date and time the token was created.
Expiry Date: The date and time the token will expire.
Scope: An indication of the permissions allowed by the token.
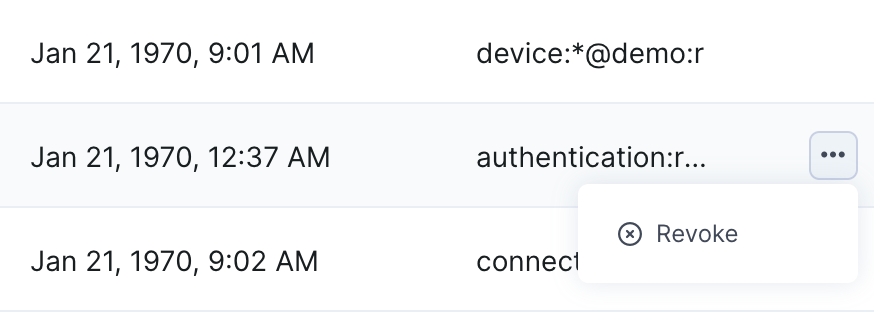
To revoke a token, click the three dots at the end of the relevant row and click Revoke.
You can create the following types of access tokens:
User: Also called an identity token or a user-scoped token. This token provides access according to the permissions defined for the user in the User Permissions page. This kind of token can be created in Connect or in the JFrog Platform.
Custom: These tokens, also known as scoped tokens, have permissions that are customized for a specific purpose. For example, the token allows access by any Connect user, but allows access to certain resources (e.g., a device or a project) and functions (e.g., read or write) only, and not to others. These tokens can be created only in Connect and only by an administrator user.
To create a new token, do the following:
Go to Settings in the left navigation bar and click the Access Tokens tab.
In the Access tokens tab, click the + on the upper right and enter a Description and Expiration Date for the new token.
Under Token Scope, choose User and select the user from the dropdown list.
Generate the token.
To create a new token, do the following:
Go to Settings in the left navigation bar and click the Access Tokens tab.
In the Access tokens tab, click the + on the upper right and enter a Description and Expiration Date for the new token.
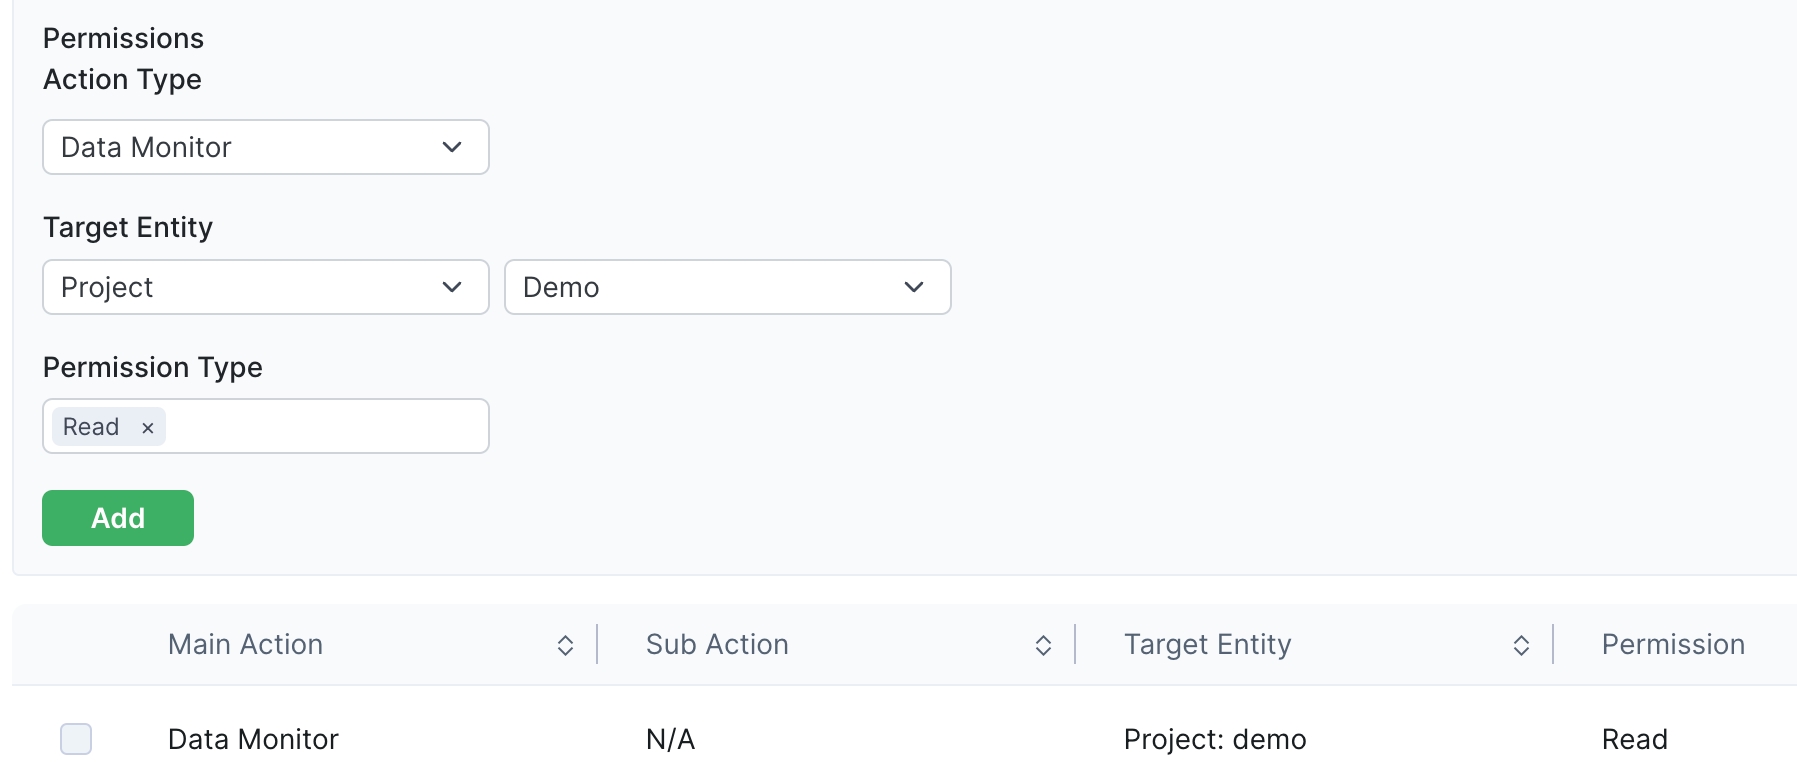
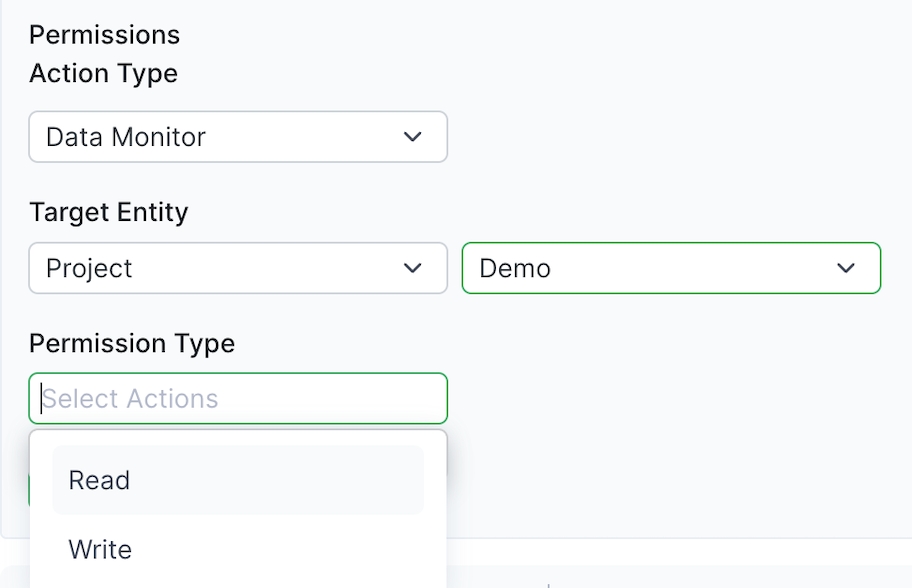
Under Token Scope, choose Custom and choose a Permissions Action Type. (Device is currently the only option.) Permissions Action Type enables access to a certain feature or set of features in Connect, such as device metadata.
Choose the Target Entity and the Permission Type from the respective lists. The target entity can be either Project or Device.
Click Add. The permission will be added to the table in the lower part of the page. You may create multiple permissions for the token, and each permission will appear as a row in the table. Once you have created all the necessary permissions, generate the token.
After you generate the new access token, it will be displayed.
Learn about the Connect API v2 and the details of all the API requests you can use.
The user-scoped token provides access according to the user role (admin or non-admin) defined for the user in the JFrog Platform. If the user is a non-admin role, the token has access according to permissions defined for the user in the User Permissions page in Connect. Only an administrator user can generate a user token.
The user token is created in JFrog Platform and valid in both JFrog Platform and Connect.
To generate a user token, refer to the Access Tokens page.
This token, also known as a resource-scoped token or a custom token, has permissions that are customized for a specific purpose. For example, the token allows access by any Connect user, but allows access only to certain resources (e.g., a device or a project) and functions (e.g., read or write), and not to others. This increases the system security by enabling you to construct a token that is very specific to the permissions allowed.
The Device Details Token can be created only in Connect and only by an administrator user. The token is valid only in Connect. Once you have created the token, it is managed in JFrog Platform where all of your tokens are managed.
Tip: All of your tokens are managed in JFrog Platform.
To create a device details token, do the following:
Go to General Settings in the left navigation bar and to the Account tab.
Under Access Token, click Device Details Token. The Generate Device Details Token panel appears on the right.
Enter a Description and an Expiration Date for the new token.
Under Permissions, choose a Target Entity:
Fleet: From the dropdown list, choose the fleet the token will have access to.
Device: From the dropdown list, choose the device (device name) the token will have access to.
Choose the Permission Type, e.g., Read, Write, or Delete. You can choose one or multiple permission types.
Generate the token and save it to the clipboard.
After you generate the new access token, it will be displayed.
Learn about the Connect API v2 and the details of all the API requests you can use.
Endpoint payload data is in JSON format.
Input parameters in Connect, such as project name, group, device, access tokens, etc., are case sensitive.
The user_token can be found in the Settings category on Connect dashboard under your account.
Connect Agent Compatibility: The Connect Agent versions 7.0 and higher do not support Connect API v1. If your devices have Connect Agent 7.0 or higher and you want to use the API, use Connect API v2.
Devices with agent 5.4 and above, run the agent with the flag --print-token to receive the device token: /etc/connect/service/ConnectAgent --print-token
Here's a ready-to-use script to grab the device token:
import subprocess

CONNECT_AGENT_PATH = "/etc/connect/service/ConnectAgent"
AGENT_FLAG_TO_GET_DEVICE_TOKEN = "--print-token"

user_token = "Your user token can be found in the Connect UI"
device_token = subprocess.check_output(CONNECT_AGENT_PATH + ” ” + AGENT_FLAG_TO_GET_DEVICE_TOKEN, shell#! /bin/bash
/etc/connect/service/ConnectAgent --print-tokenDevices with agent 5.3 and below, device_token can be found in the file /etc/connect/service/settings.json
import json
import requests

#Upswift tokens
user_token = "<user token>"

json_content = {'user_token': user_token,
                'app_name': 'some-name',
                'device_filter': {'project': {'name': 'Demo'},
                                   'groups': [{'name': 'TestGroup1'}, {'name': 'TestGroup2'}],
                                   'filters': [{'type': 'specific_device',
                                                'operand': 'is',
                                                'value': 'd-4ec7-1be9'}]}
                }


call_request = requests.delete("https://api.connect.jfrog.io/v1/device_apps", json=json_content)
call_response = json.loads(call_request.text)

if call_request.status_code != 200:
    if call_request.status_code == 429:
        error = "API limit reached"
    else:
        error = call_response["error_message"]
    print(error)
else:
    response_message = call_response["message"]
{
    "user_token": "<user token>",
    "app_name": "some-app-name",
    "device_filter": {"project": {"name": "Demo"},
                       "groups": [{"name": "TestGroup1"}, {"name": "TestGroup2"}],
                       "filters": [{"type": "specific_device",
                                    "operand": "is",
                                    "value": "d-4ec7-1be9"}]},
}import json
import requests
#Connect tokens
user_token = "<user_token>"
device_token = "<device_token>"
json_content = {'user_token': user_token,
'device_token': device_token,
'device_name': 'new_device_name',
'group': 'Production',
'tag': 'test_tag',
'apps': [{'app_name': 'default_app', 'version': 'v1.1'}],
'description': 'Some kind of description for that device'}
call_request = requests.post("https://api.connect.jfrog.io/v1/devices_details", json=json_content)
call_response = json.loads(call_request.text)
if call_request.status_code != 200:
if call_request.status_code == 429:
error = "API limit reached"
else:
error = call_response["error_message"]
print(error)
operandisis_notapp - Set this value if you want to filter devices by the apps that are set to them. The value of the value key of this type is the app name. The possible operand key values for this type are: is, is_not.
device_state - Set this value if you want to filter devices by their state. The possible values of the value key of this type are: online, offline. The possible operand key value of this type is: is
update_status - Set this value if you want to filter devices by their last update status. The possible values of the value key of this type are: pending, in_progress, success, failed, aborted. The possible operand key value of this type is: is, is_not
"filters": [{"type": "<filter_type>", "operand": "<operand>", "value": "<value>"}]<type> <operand><value>filtersdevice_name
string
A new name for that device.
group
string
The name of the group you want to switch for that device (the group must exist at the dashboard).
software_version
string
Deprecated parameter - Use the apps parameter to modify software versions.
address
string
A new address for that device. Please note, the address will be validated using Google Maps. Available only for Premium/Special plans.
lat
string
A new Latitude for the device. (must be called with the lng parameter). Available only for Premium/Special plans.
lng
string
A new Longitude for the device. (must be called with the lat parameter). Available only for Premium/Special plans.
description
string
The description of the device. Can be anything you want.

user_token*
string
This is your account token. You can find it under the Settings category on the dashboard.
device_token
string
This is the device token. (See Notes below.)
device_id
String
This is the device ID or device UUID. (See Notes below.)
{"message": {"device_status": "online",
{"device_id": "d-1234-abcd"}}{"error_message": "<ERROR_MESSAGE>"}{}Notes:
Either the device_token or the device_id must be provided.
You may use either device_id or device_uuid in the device_id field. Either one will adequately function as an identifier.
import json
import requests

json_content = {'device_id': 'd-1234-abcd',
                'user_token': 'YYYYYYYYYYYYYYY'}

call_request = requests.get("https://api.connect.jfrog.io/v1/get_device_state"

curl --location --request GET 'https://api.connect.jfrog.io/v1/get_device_state' \
--header 'Content-Type: application/json' \
--data-raw '{
    "user_token": "YYYYYYYYYYYYYYY",
    "device_id": "d-1234-abcd"
}'Gets information about all the port tunnels in a project. The port tunnels may be open or closed (also called finished). The status returned may be one of the following:
Pending: A new port tunnel that has not yet opened.Opened: A port tunneling session currently active.Closed: The user has ended the port tunneling session.Terminated: The tunnel was closed, but not due to user request.Gets information about all the port tunnels in a project. The port tunnels may be open or closed (also called finished). The status returned may be one of the following:
Pending: A new port tunnel that has not yet opened.Opened: A port tunneling session currently active.Closed: The user has ended the port tunneling session.Terminated: The tunnel was closed, but not due to user request.limit
integer
The number of results per page.
The maximum limit is 50.
Default is 20.
offset
integer
Offset to start pagination search results.
This should be the last device_id from the previous request.
device_name
String
Returns the details of a specific device, defined by name.
the name must be exactly equal.
user_token*
string
This is your account token. You can find it under the Settings category on the dashboard.
device_token
string
This is the token of the device you want to get the details of. If you set the device_token, other parameters will be ignored.
group_name
string
This is the group name of the group you would like to get all its device details. Using group_name parameter will work only if project_name is set.
project_name
string
This is the project name of the project you would like to get all its devices state.
{
    "more": false,
    "message": [
            {"device_id": 123456,
             "device_uuid": "d-1234-1234",
             "device_name": "My-Device-1",
             "upswift_version": "5.1",
             "project": "Test",
             "group": "Production",
             "device_ip": "10.10.10.10",
             "last_keepalive": "2020-02-08 16:12:11",
             "cpu_usage": 65,
             "ram_usage": 15,
             "disk_usage": 1022.1,
             "address": "Nurenberg, Germany",
             "lat": 49.4521,
             "lng": 11.0767,
             "is_update_trigger_set": false,
             "description": "device description example",
             "registered_date": "2020-02-07 16:12:11",
             "tags": ["London", "Lab Device", "4inch-screen"],
             "updates": [
                         {"update_id": 1234,
                         "update_status": "success",
                         "update_version": "v1.1",
                         "comment": "Some kind of a comment",
                         "deployment_schedule_time": "2020-02-08 16:12:11"
                         },
                         {
                         update_id": 5555,
                         "update_status": "pending",
                         "update_version": "v1.2",
                         "comment": "Some kind of a comment",
                         "deployment_schedule_time": "2020-03-09 19:12:11"
                         }
                         ],
             "updates_v2": [
                         {"flow_name": "Some Name",
                         "update_status": "success",
                         "comment": "Some kind of a comment",
                         "deployment_schedule_time": "2020-02-08 16:12:11",
                         "deployment_start_time": "2020-02-08 16:12:11",
                         "deployment_finish_time": "2020-02-08 16:12:11",
                         "apps_updated": [{"app_name": "app1", "app_new_version": "v1.1"}],
                         "deployment_type": "manual"
                         },
                         {
                         "flow_name": "Some Name2",
                         "update_status": "failed",
                         "comment": "Some kind of a comment",
                         "deployment_schedule_time": "2020-02-08 16:12:11",
                         "deployment_start_time": "2020-02-08 16:12:11",
                         "deployment_finish_time": "2020-02-08 16:12:11",
                         "apps_updated": [{"app_name": "app1", "app_new_version": "v1.1"}],
                         "deployment_type": "api-deployment"
                         }
                         ],
             "apps": [{"app_name": "default_app",
                       "version": "v1.1"}],
             "mac_addresses": ["ff:ff:ff:ff:ff:ff", "ff:ff:ff:ff:ff:ff", "ff:ff:ff:ff:ff:ff"],
             }
             ]
 }
offset
integer
Offset to start pagination search results.
This should be the last device_uuid from the previous request.
user_token
string
This is your account token. You can find it under the Settings category on the dashboard.
group_name
string
This is the group name of the group you would like to get all its devices state.
project_name
string
This is the project name of the project you would like to get all its devices state.
limit
integer
The number of results per page.
The maximum limit is 50.
Default is 20.
{"message": {"device_status": "online",
             "device_uuid": "d-1234-abcd",
"device_name": "My-Device-1"}}{"error_message": "<ERROR_MESSAGE>"}{}{"error_message": "<ERROR_MESSAGE>"}{}1. device_id - Integer - The ID of the device.
2. device_name - String - The name of the device.
3. upswift_version - String - Upswift Agent version.
4. device_uuid - string - The UUID of the device (as shown in the dashboard)
5. project - String - The name of the project this device is registered to.
6. group - String - The name of the group this device is registered to.
7. device_ip - String - The IP of the device.
8. last_keepalive - String(DATETIME) - The last time a keep-alive message received from that device.
9. cpu_usage - Integer - The current CPU usage of the device (Percentage - value can be 0-100).
10. ram_usage - Integer - The current RAM usage of the device (Percentage - value can be 0-100).
11. disk_usage - Float - The current Disk usage of the device (MegaBytes).
12. address - String - The current address set for this device.
13. lat - Float - The current Latitude parameter set for this device.
14. lng - Float - The current Longitude parameter set for this device.
15. is_update_trigger_set - Boolean - If the parameter update trigger is currently set. valid values true/false.
16. description - String - The description of that device.
17. registered_date - String(DATETIME) - The date when this device has been registered to the platform.
18. tags - List of Strings - A list of all of the tags for this device.
19. updates - List of JSONs - The last 5 updates of that device with information regarding those updates.
Each JSON includes the next parameters:
1. update_id - Integer - The ID of the update.
2. update_status - String - The status of the update.
Possible values are:
pending - The update is pending and will be deployed at the scheduled time.
in_progress - The update is in progress state, meaning it is currently being deployed.
success - The update successfully finished the deployment. failed - The deployment failed.
3. update_version - String - The version of the update.
4. comment - String - The comment set to the update when it was created.
5. deployment_schedule_time - String(DATETIME) - The time the deployment was scheduled to. By default this is the update creation time. Please note the value is UTC time with the next format: Year-Month-Day Hour:Minute:Second.
20. updates_v2 - List of JSONs - the last 5 updates (v2) of that device with information regarding those updates. Each JSON includes the next parameters:
1. flow_name - String - The name of the flow that was deployed.
2. deployment_status - String - The status of the update. Possible values are: pending - The update is pending and will be deployed at the scheduled time.
pending - The update is pending and will be deployed if the Update Window is open.
in_progress - The update is in progress state, meaning it is currently being deployed.
success - The update successfully finished deployment. failed - The deployment failed.
3. comment - String - The comment set to the deployment when it was created.
4. deployment_scheduled_time - String(DATETIME) - The time the deployment was scheduled to. By default this is the deployment creation time. Please note the value is UTC time with the next format: Year-Month-Day Hour:Minute:Second.
5. apps_updated - List of JSONs - The apps that were set during the deployment. The JSON object contains 2 keys: {"app_name": "<name>", "app_new_version": "<version>"}
6. deployment_type - String - The type of the deployment. Possible values are: manual, api-deployment.
21. apps - List of JSONs - A list of apps that this device has and their versions. the JSON object contains 2 keys: {"app_name": "<name>", "version": "<version>"}. The value of "more" is a boolean representing if there are more devices to query.import json
import requests
json_content = {'project_name': 'MYPROJECT',
'group_name': 'Production',
'user_token': 'YYYYYYYYYYYYYYY'}
call_request = requests.get("https://api.connect.jfrog.io/v1/devices_details", json=json_content)
call_response = json.loads(call_request.text)
if call_request.status_code != 200:
if call_request.status_code == 429:
error = "API limit reached"
else:
error = call_response["error_message"]
print(error)
else:
for device in call_response["message"]:
device_name = device["device_name"]
device_id = device["device_id"]
device_uuid = device["device_uuid"]
upswift_version = device["upswift_version"]
project = device["project"]
group = device["group"]
device_ip = device["device_ip"]
last_keepalive = device["last_keepalive"]
cpu_usage = device["cpu_usage"]
ram_usage = device["ram_usage"]
address = device["address"]
lat = device["lat"]
lng = device["lng"]
is_update_trigger_set = device["is_update_trigger_set"]
description = device["description"]
registered_date = device["registered_date"]
updates = device["updates"]
tags = device["tags"]
updates = device["updates_v2"]
apps = device["apps"]
mac_addresses = device["mac_addresses"]
import json
import requests
json_content = {'project_name': 'MYPROJECT',
                'group_name': 'Production',
                'user_token': 'YYYYYYYYYYYYYYY'}

call_request = requests.get("https://api.connect.jfrog.io/v1/get_devices_state", json=json_content)
call_response = json.loads(call_request.text)

if call_request.status_code != 200:
    if call_request.status_code == 429:
        error = "API limit reached"
    else:
        error = call_response["error_message"]
    print(error)
else:
    for device in call_response["message"]:
        device_status = device["device_status"]
        device_uuid = device["device_uuid"]
        device_name = device["device_name"]
curl --location --request GET 'https://api.connect.jfrog.io/v1/get_devices_state' \
--header 'Content-Type: application/json' \
--data-raw '{
    "user_token": "YYYYYYYYYYYYYYY"
}'You will need to get an access token from the Connect web UI to use the Connect API v2. The v1 token will not work for v2.
Important: For security reasons, the new token generated by Connect will not be stored. Ensure that you copy the token and save it in a safe place.
The project key of the relevant project in the account. An account can have multiple projects. If you don't know the project key, you can find it in the Settings of the web UI in the Projects tab.
OK
OK
You will need to get an access token from the Connect web UI to use the Connect API v2. The v1 token will not work for v2.
Important: For security reasons, the new token generated by Connect will not be stored. Ensure that you copy the token and save it in a safe place.
The project key of the relevant project in the account. An account can have multiple projects. If you don't know the project key, you can find it in the Settings of the web UI in the Projects tab.
The UUID that is the unique identifier of the port tunnel.
OK
OK
You will need to get an access token from the Connect web UI to use the Connect API v2. The v1 token will not work for v2.
Important: For security reasons, the new token generated by Connect will not be stored. Ensure that you copy the token and save it in a safe place.
The project key of the relevant project in the account. An account can have multiple projects. If you don't know the project key, you can find it in the Settings of the web UI in the Projects tab.
The UUID that is the unique identifier of the port tunnel.
No Content
No Content
No content
POST https://api.connect.jfrog.io/v2/deploy_update
Using this call, you can deploy update flows on your devices. This is useful for CI/CD integrations and when you would like to deploy updates on your device fleet automatically.
Possible types and values:
devices_filter object:
filters key:
Possible values for the
All values must be of type: String.
Full payload example:
Returns the status of the deployment on the devices included in the deployment. The status information includes the start and finish time of the deployment on each device, the deployment status (success or failure), and the status of each action block (steps) included in the update flow.
Aborts the deployment that you specify with the fleet key and the deployment UUID. This action stops the deployment to all devices that are in Pending state and tries to stop the deployments that are in In Progress state. The abort action does not affect devices that are already in Succeeded or Failed state.
Once the deployment has been aborted, the status of the devices is indicated as Aborted in the Status column of the Detailed Deployment Information page in the web UI.
Aborts the deployment to a specific device that you specify. You will need to specify the fleet key, the deployment UUID, and the device UUID. This action stops the deployment to the device if it is in Pending state and tries to stop a deployment that is in In Progress state. The abort action will not affect a device if it is already in Succeeded or Failed state.
GET /api/v2/{project_key}/port_tunnel HTTP/1.1
Host: api.connect.jfrog.io
Authorization: Bearer YOUR_SECRET_TOKEN
Accept: */*
GET /api/v2/{project_key}/port_tunnel/{port_tunnel_id} HTTP/1.1
Host: api.connect.jfrog.io
Authorization: Bearer YOUR_SECRET_TOKEN
Accept: */*
DELETE /api/v2/{project_key}/port_tunnel/{port_tunnel_id} HTTP/1.1
Host: api.connect.jfrog.io
Authorization: Bearer YOUR_SECRET_TOKEN
Accept: */*
deployment_configuration
String
A JSON object that defines the configuration that will be deployed with the update.
comment
String
Set the <comment> as the comment for that deployment. The value of this key is a String.
app
String
"app": {"name": "<app_name>", "version": "<app_version>"} Set the <app_name> as the name of the app you created on Connect dashboard. Set the <app_version> as the version for this app. Devices that will deploy the update successfully, their app version will change to the app_version you set here.
typespecific_device - Set this value if you want to filter one specific device. The value of the value key of this type is the ID of the device you want to filter (you can obtain the id on Connect dashboard). The possible operand key values for this type are: is, is_not
tag - Set this value if you want to filter devices by a tag. The value of the value key of this type is the name of the tag you want to filter (you can obtain the tag name on Connect dashboard). The possible operand key values for this type are: is, is_not
app - Set this value if you want to filter devices by the apps that are set to them. The value of the value key of this type is the app name. The possible operand key values for this type are: is, is_not. Additionally, you can set an app_version property to filter to a specific app version.
device_state - Set this value if you want to filter devices by their state. The possible values of the value key of this type are: online, offline. The possible operand key value of this type is: is
deployment - Set this value if you want to filter devices by the deployment_id and deployment status. The possible values for value are pending, in_progress, success, failed, aborted, any. You must set the deployment_id property with the value from the deployments table on the platform.
user_token
string
This is your account token. Can be found under the Settings category on Connect dashboard.
flow_id
string
This is the id of the update flow you created on Connect dashboard. You can find it at the Updates category under the Update Flows tab.
devices_filter
object
A JSON object with the filter you would like to apply on your devices fleet. This filter will be applied and the result will be the devices that receive this update. The object has multiple keys:
1. "project": {"name": "<project_name>"} set the <project_name> as your project name from Connect dashboard. The project key must exist and the value of it is a JSON with the key name.
2. "groups": [{"name": "<group_name>"}] set the <group_name> as a group name from Connect dashboard. The groups key is a must key but the value of it can be an empty list. The value of it is a list of JSON objects each has a key called name. If multiple groups exist, all devices within those groups will receive the update.
3. "filters": [{"type": "<filter_type>", "operand": "<operand>", "value": "<value>"}] the filters key lets you add custom filters. Set the <type> key as the type of the filter (possible types can be found under this form). Set the <operand> key as the operand for this filter (possible operands can be found under this form). Set the <value> key as the value for this filter (the value depends on the type of the filter, examples can be found under this form).
You can set multiple filters, if you do so, they will all be applied on top of each other (examples can be found under this form). The filters key is a must key but the value of it can be an empty list.
parameters_mapping
String
Defines the update parameters values that are configured in the update flow.
"update_param_name": "value",
"update_param_name2": "value",
{"error_message": "<ERROR_MESSAGE>"}{}{"message": "Created"}{
"user_token": "<user token>",
"device_filter": {
"project": { "name": "Demo" },
"groups": [{ "name": "TestGroup1" }, { "name": "TestGroup2" }],
"filters": [
{ "type": "specific_device", "operand": "is", "value": "d-4ec7-1be9" },
{ "type": "deployment", "deployment_id": "dp-9yl3-9ch7", "operand": "is", "value": "failed" }
]
},
"deployment_configuration": {
"flow_id": "f-dd0c-73b9",
"comment": "test webhook 1",
"app": { "name": "default_app", "version": "v1.1" },
"parameters_mapping": {
"username": "ubuntu",
"conf_path": "/etc/app/settings.conf"
}
}
}import json
import requests
#Upswift tokens
user_token = "<user token>"
json_content = {
"user_token": user_token,
"device_filter": {
"project": { "name": "Demo" },
"groups": [{ "name": "TestGroup1" }, { "name": "TestGroup2" }],
"filters": [
{ "type": "specific_device", "operand": "is", "value": "d-4ec7-1be9" },
{ "type": "deployment", "deployment_id": "dp-9yl3-9ch7", "operand": "is", "value": "failed" }
]
},
"deployment_configuration": {
"flow_id": "f-dd0c-73b9",
"comment": "test webhook 1",
"app": { "name": "default_app", "version": "v1.1" },
"parameters_mapping": {
"username": "ubuntu",
"conf_path": "/etc/app/settings.conf"
}
}
}
call_request = requests.post("https://api.connect.onprem/v2/deploy_update", json=json_content)
call_response = json.loads(call_request.text)
if call_request.status_code != 200:
if call_request.status_code == 429:
error = "API limit reached"
else:
error = call_response["error_message"]
print(error)
else:
response_message = call_response["message"]You will need to get an access token from the Connect web UI to use the Connect API v2. The v1 token will not work for v2.
Important: For security reasons, the new token generated by Connect will not be stored. Ensure that you copy the token and save it in a safe place.
The fleet key of the relevant fleet in the account. An account can have multiple fleets (formerly called projects). If you don't know the fleet key, you can find it in the Fleet Settings of the web UI.
Created
Created
You will need to get an access token from the Connect web UI to use the Connect API v2. The v1 token will not work for v2.
Important: For security reasons, the new token generated by Connect will not be stored. Ensure that you copy the token and save it in a safe place.
The fleet key of the relevant fleet in the account. An account can have multiple fleets (formerly called projects). If you don't know the fleet key, you can find it in the Fleet Settings of the web UI.
Pagination token to get the next page of results
The maximum number of devices to return in the response
100OK
OK
You will need to get an access token from the Connect web UI to use the Connect API v2. The v1 token will not work for v2.
Important: For security reasons, the new token generated by Connect will not be stored. Ensure that you copy the token and save it in a safe place.
The fleet key of the relevant fleet in the account. An account can have multiple fleets (formerly called projects). If you don't know the fleet key, you can find it in the Fleet Settings of the web UI.
The UUID of the deployment you are acting on. This is a unique identifier in Connect, for example, dp-e6a5-7e19, and can be found in the web UI in the Deployments table.
OK
NOT FOUND
You will need to get an access token from the Connect web UI to use the Connect API v2. The v1 token will not work for v2.
Important: For security reasons, the new token generated by Connect will not be stored. Ensure that you copy the token and save it in a safe place.
The fleet key of the relevant fleet in the account. An account can have multiple fleets (formerly called projects). If you don't know the fleet key, you can find it in the Fleet Settings of the web UI.
The UUID of the deployment you are acting on. This is a unique identifier in Connect, for example, dp-e6a5-7e19, and can be found in the web UI in the Deployments table.
The UUID of the device you are acting on. This is the unique identifier of the device in Connect, for example, d-4cfe-4e51. You can find the UUID in the ID column of the Devices table in the Devices page of the web UI.
OK
NOT FOUND
You will need to get an access token from the Connect web UI to use the Connect API v2. The v1 token will not work for v2.
Important: For security reasons, the new token generated by Connect will not be stored. Ensure that you copy the token and save it in a safe place.
The fleet key of the relevant fleet in the account. An account can have multiple fleets (formerly called projects). If you don't know the fleet key, you can find it in the Fleet Settings of the web UI.
The UUID of the deployment you are acting on. This is a unique identifier in Connect, for example, dp-e6a5-7e19, and can be found in the web UI in the Deployments table.
Created
Created
You will need to get an access token from the Connect web UI to use the Connect API v2. The v1 token will not work for v2.
Important: For security reasons, the new token generated by Connect will not be stored. Ensure that you copy the token and save it in a safe place.
The fleet key of the relevant fleet in the account. An account can have multiple fleets (formerly called projects). If you don't know the fleet key, you can find it in the Fleet Settings of the web UI.
The UUID of the deployment you are acting on. This is a unique identifier in Connect, for example, dp-e6a5-7e19, and can be found in the web UI in the Deployments table.
The UUID of the device you are acting on. This is the unique identifier of the device in Connect, for example, d-4cfe-4e51. You can find the UUID in the ID column of the Devices table in the Devices page of the web UI.
Created
Created
Creates an update flow in JFrog Connect. When this request completes successfully, the update flow is visible in the web UI and can be deployed either from the web UI or by using the Deploy Update request in the Connect API.
Important: The Body of this request must be sent in YAML format. Note that the example Body of this request might be shown in JSON format in your tool for sending API requests. Regardless, the Body you send with the request must be in YAML format.
Gets all update flows for a fleet. Each update flow returned includes the name, UUID, update parameters (if any), time created, and CVE severities of any security issues detected.
The fleet key of the relevant fleet in the account. An account can have multiple fleets (formerly called projects). If you don't know the fleet key, you can find it in the Fleet Settings of the web UI.
my-fleet-abcReturns the YAML definition of the update flow that you specify. The request returns a YAML only for update flows that were created by sending a YAML with the Create Update Flow API request. No data is returned for update flows created with the web UI.
The fleet key of the relevant fleet in the account. An account can have multiple fleets (formerly called projects). If you don't know the fleet key, you can find it in the Fleet Settings of the web UI.
The UUID identifying the update flow.
Returns the details about a single device.
The fleet key of the relevant fleet in the account. An account can have multiple fleets (formerly called projects). If you don't know the fleet key, you can find it in the Fleet Settings of the web UI.
The UUID of the device you are acting on. This is the unique identifier of the device in Connect, for example, d-4cfe-4e51. You can find the UUID in the ID column of the Devices table in the Devices page of the web UI.
Updates information on a device. You can make updates using the Add, Replace, and Remove operations, and you can replace values of multiple parameters in a single API request. This request is based on the specification.
For the "tags" value, spaces are allowed in the tag name. You can add multiple tag values, with each value separated by a comma.
POST /api/v2/{project_key}/deployments HTTP/1.1
Host: api.connect.jfrog.io
Authorization: Bearer YOUR_SECRET_TOKEN
Content-Type: application/json
Accept: */*
Content-Length: 497

{
  "device_filter": {
    "groups": [
      {
        "name": "Production"
      }
    ],
    "filters": [
      {
        "type": "specific_device",
        "operand": "is",
        "value": "d-feaf-d9aa"
      },
      {
        "type": "deployment",
        "deployment_id": "dp-9yl3-9ch7",
        "operand": "is",
        "value": "failed"
      },
      {
        "type": "app",
        "app_version": "dp-9yl3-9ch7",
        "operand": "is",
        "value": "failed"
      }
    ]
  },
  "deployment_configuration": {
    "flow_uuid": "f-7b56-3336",
    "comment": "test webhook 1",
    "app": {
      "name": "default_app",
      "version": "v1.1"
    },
    "parameters_mapping": {
      "username": "ubuntu",
      "conf_path": "/etc/app/settings.conf"
    }
  }
}GET /api/v2/{project_key}/deployments HTTP/1.1
Host: api.connect.jfrog.io
Authorization: Bearer YOUR_SECRET_TOKEN
Accept: */*
GET /api/v2/{project_key}/deployments/{deployment_uuid} HTTP/1.1
Host: api.connect.jfrog.io
Authorization: Bearer YOUR_SECRET_TOKEN
Accept: */*
GET /api/v2/{project_key}/deployments/{deployment_uuid}/devices HTTP/1.1
Host: api.connect.jfrog.io
Authorization: Bearer YOUR_SECRET_TOKEN
Accept: */*
GET /api/v2/{project_key}/deployments/{deployment_uuid}/devices/{device_uuid} HTTP/1.1
Host: api.connect.jfrog.io
Authorization: Bearer YOUR_SECRET_TOKEN
Accept: */*
POST /api/v2/{project_key}/deployments/{deployment_uuid}/abort HTTP/1.1
Host: api.connect.jfrog.io
Authorization: Bearer YOUR_SECRET_TOKEN
Accept: */*
[
  {
    "created_time": "Mon, 16 Dec 2024 10:17:37 GMT",
    "device_id": "d-c8b9-02aa",
    "finish_time": "Mon, 16 Dec 2024 10:17:59 GMT",
    "port_tunnel_id": "015900c8-3dae-43bd-8133-cb828470b73e",
    "remote_server_address": "d-c8b9-02aa-agwb8q9wfem.forwarding.connect.jfrog.io",
    "remote_server_port": 52466,
    "status": "closed",
    "user_source_ip": "52.215.237.185"
  },
  {
    "created_time": "Mon, 16 Dec 2024 10:21:10 GMT",
    "device_id": "d-c8b9-02aa",
    "finish_time": "Mon, 16 Dec 2024 11:12:00 GMT",
    "port_tunnel_id": "7d7a7462-cc5b-4f9a-b678-d3288475de02",
    "remote_server_address": "d-c8b9-02aa-crwapf2u2ia.forwarding.connect.jfrog.io",
    "remote_server_port": 44187,
    "status": "closed",
    "user_source_ip": "1.1.1.1"
  },
  {
    "created_time": "Tue, 17 Dec 2024 10:13:17 GMT",
    "device_id": "d-c8b9-02aa",
    "finish_time": "Tue, 17 Dec 2024 12:13:17 GMT",
    "port_tunnel_id": "7a4d651a-09a9-4d22-be60-4a33ad8a740c",
    "remote_server_address": "d-c8b9-02aa-5aezyhyebus.forwarding.connect.jfrog.io",
    "remote_server_port": 34610,
    "status": "closed",
    "user_source_ip": "52.215.237.185"
  }
]{
"created_time": "Mon, 16 Dec 2024 10:17:37 GMT",
"device_id": "d-c8b9-02aa",
"finish_time": "Mon, 16 Dec 2024 10:17:59 GMT",
"port_tunnel_id": "015900c8-3dae-43bd-8133-cb828470b73e",
"remote_server_address": "d-c8b9-02aa-agwb8q9wfem.forwarding.connect.jfrog.io",
"remote_server_port": 52466,
"status": "closed",
"user_source_ip": "52.215.237.185"
}{
"deployment_uuid": "dp-22be-13ba"
}{
"deployments": [
{
  "comment": "",
  "created_time": "2023-01-09 12:03:28",
  "cve_severity": null,
  "Critical": 0,
  "High": 0,
  "Low": 0,
  "Medium": 0,
  "deployment_uuid": "dp-e6a5-7e19",
  "type": "manual"
}
],
"pagination_info": {
"after": "text",
"total": 1
}
}{
"comment": "",
"created_time": "2023-01-09 12:03:28",
"cve_severity": null,
"Critical": 0,
"High": 0,
"Low": 0,
"Medium": 0,
"deployment_uuid": "dp-e6a5-7e19",
"type": "manual"
}{
"deployment_by_device_uuid": {
"2c55-e275": {
"finished_time": null,
"started_time": null,
"status": "Pending"
},
"435d-3443": {
"finished_time": null,
"started_time": null,
"status": "Pending"
},
"a72c-b016": {
"finished_time": null,
"started_time": null,
"status": "Pending"
}
},
"pagination_info": {
"after": "eyJjdXJzb3IiOiA0OTEsICJsaW1pdCI6IDN9",
"total": 3
}
}{
"summary": "200 OK Deployment status failed",
"value": {
"finished_time": "2024-03-26 15:09:05",
"started_time": "2024-03-26 15:09:04",
"status": "Failed",
"steps": [
{
"exit_code": 0,
"name": "Script Block",
"stderr": "sh: 1: /usr/bin/python: not found\n",
"stdout": "Script exited with bad exit-code: 127"
}
]
}
}{
"message": "Deployment aborted successfully"
}POST /api/v2/{project_key}/deployments/{deployment_uuid}/devices/{device_uuid}/abort HTTP/1.1
Host: api.connect.jfrog.io
Authorization: Bearer YOUR_SECRET_TOKEN
Accept: */*
{
  "message": "Deployment for device aborted successfully"
}The fleet key of the relevant fleet in the account. An account can have multiple fleets (formerly called projects). If you don't know the fleet key, you can find it in the Fleet Settings of the web UI.
Update flows created successfully.
Bad Request - Invalid YAML format or data.
Unsupported Media Type - Content-Type must be application/yaml.
The maximum number of records to return.
100The cursor to use for pagination. Returns the next set (i.e., next cursor) of records. This is applicable whenever the number of records to be returned is greater than the limit. For example, if the first cursor returned the limit of 100 records, this parameter is required to receive the next 100 records. The value of the input string can be found in the output of the current cursor.
Successfully retrieved all update flows.
Unauthorized - API key is missing or invalid.
Forbidden - Insufficient permissions.
Internal Server Error.
Update flow YAML retrieved successfully.
Unauthorized - API key is missing or invalid.
Forbidden - Insufficient permissions.
No Found - Update flow with uuid / yaml not found.
Internal Server Error.
You will need to get an access token from the Connect web UI to use the Connect API v2. The v1 token will not work for v2.
Important: For security reasons, the new token generated by Connect will not be stored. Ensure that you copy the token and save it in a safe place.
The fleet key of the relevant fleet in the account. An account can have multiple fleets (formerly called projects). If you don't know the fleet key, you can find it in the Fleet Settings of the web UI.
The name of the group the device belongs to. If you do not specify a group name, then all the devices in the project will be specified.
Returns devices having this tag. To search for multiple tags, for example, records having tag-a, or tag-b, or tag-c, enter a separate key and value for each tag to include. (For example, a new row in the Query Params table for each tag.)
Returns the next set (i.e., next cursor) of records. This is applicable whenever the number of devices to be returned is greater than the limit. For example, if the first cursor returned the limit of 100 records, this parameter is required to receive the next 100 records. The value of the input string can be found at the end of the output of the current cursor.
The number of devices to show in each cursor of data returned. Default is 100, and maximum is 1000. Must be positive integer.
100Returns the device tags for each device. If there are more that 100 tags it will return the first 100 and a message. Default is False.
OK
Forbidden
Returns additional information about the device, including app_name, version, mac_addresses, tags, and updates. Updates includes the last five updates to the device. Default is False.
OK
Not Found
The fleet key of the relevant fleet in the account. An account can have multiple fleets (formerly called projects). If you don't know the fleet key, you can find it in the Fleet Settings of the web UI.
The UUID of the device you are acting on. This is the unique identifier of the device in Connect, for example, d-4cfe-4e51. You can find the UUID in the ID column of the Devices table in the Devices page of the web UI.
application/json-patch+jsonOK
Bad Request
Unauthorized
Not Found
You will need to get an access token from the Connect web UI to use the Connect API v2. The v1 token will not work for v2.
Important: For security reasons, the new token generated by Connect will not be stored. Ensure that you copy the token and save it in a safe place.
The fleet key of the relevant fleet in the account. An account can have multiple fleets (formerly called projects). If you don't know the fleet key, you can find it in the Fleet Settings of the web UI.
The UUID of the device you are acting on. This is the unique identifier of the device in Connect, for example, d-4cfe-4e51. You can find the UUID in the ID column of the Devices table in the Devices page of the web UI.
The fleet key to which the device is transferred.
The group name in the destination fleet to which the device is transferred.
OK
Bad Request
Not Found
Triggers Connect to fetch files from the device you specify. For example, you can use this command to fetch logs from a device. The files are fetched from the device path you specify in the request body using the files_path attribute. You can specify a folder or a specific file.
The request returns a URL. You can use the Artifactory UI, API, or CLI to download the files from this URL. The files are not available immediately at the URL. They become available when the device uploads them and if the upload is successful.
You will need to get an access token from the Connect web UI to use the Connect API v2. The v1 token will not work for v2.
Important: For security reasons, the new token generated by Connect will not be stored. Ensure that you copy the token and save it in a safe place.
The fleet key of the relevant fleet in the account. An account can have multiple fleets (formerly called projects). If you don't know the fleet key, you can find it in the Fleet Settings of the web UI.
The UUID of the device you are acting on. This is the unique identifier of the device in Connect, for example, d-4cfe-4e51. You can find the UUID in the ID column of the Devices table in the Devices page of the web UI.
POST /api/v2/{project_key}/update-flows HTTP/1.1
Host: api.connect.jfrog.io
Content-Type: application/yaml
Accept: */*
Content-Length: 811

"flows:
  Flow-1-name:
    reboot-after-restart: false
    steps:
      - name: docker_step
        uses: connect/docker
        with:
          registry: account1
          image-path: platform-url/${{inputs.input-1-name }}/${{inputs.input-2-name }}
          image-tag: ${{ inputs.input-3-name }}
          run-options:
            restart: always
            attach: 'true'
          command: echo hello
          delete-previous-image: false
          on-failure:
            revert-all-files: true
            trigger-revert: any-step-failure
      - name: command_step
        run: echo hello
      - name: artifact_step
        uses: connect/download-artifact
        with:
          registry: account1
          artifactory-path: local-repo/file.txt
          device-path: /tmp
          on-failure:
            trigger-revert: this-step-failure
            revert-all-files: false
'on':
  workflow-dispatch:
    inputs:
      input-1-name: {}
      input-2-name: {}
      input-3-name: {}
"GET /api/v2/{project_key}/update-flows HTTP/1.1
Host: api.connect.jfrog.io
Accept: */*
GET /api/v2/{project_key}/update-flows/{update_flow_uuid} HTTP/1.1
Host: api.connect.jfrog.io
Accept: */*
GET /api/v2/{project_key}/devices/{device_uuid} HTTP/1.1
Host: api.connect.jfrog.io
Accept: */*
POST /api/v2/{project_key}/devices/{device_uuid}/move HTTP/1.1
Host: api.connect.jfrog.io
Authorization: Bearer YOUR_SECRET_TOKEN
Content-Type: application/json
Accept: */*
Content-Length: 79

{
  "destination_project_key": "project_key",
  "destination_group_name": "group_name"
}The path where the requested files are on the device.
OK
UNAUTHORIZED
NOT FOUND
POST /api/v2/{project_key}/devices/{device_uuid}/logs HTTP/1.1
Host: api.connect.jfrog.io
Authorization: Bearer YOUR_SECRET_TOKEN
Content-Type: application/json
Accept: */*
Content-Length: 35

{
  "files_path": "/home/path/to/file"
}{
"download_url": "https://example.jfrog.io/artifactory/connect-default-generic/upswift-general/devices/d-672a-f5e4/files/user_requested/logs_application/33835"
}{
"status": "success",
"message": "Update flows created successfully.",
"update_flows": [
{
"name": "text",
"uuid": "123e4567-e89b-12d3-a456-426614174000"
}
]
}{
"status": "success",
"update_flows": [
{
"name": "My Sample Flow",
"uuid": "f-g584-cc21",
"update_parameters": [
"param1_key",
"param2_key"
],
"created_time": "2023-05-15 10:30:00",
"cve_severity": "High"
}
]
}flows:
Flow-1-name:
reboot-after-restart: false
steps:
- name: docker_step
uses: connect/docker
with:
registry: account1
image-path: platform-url/${{inputs.input-1-name }}/${{inputs.input-2-name }}
image-tag: ${{ inputs.input-3-name }}
run-options:
restart: always
attach: true
command: echo hello
delete-previous-image: false
on-failure:
revert-all-files: true
trigger-revert: any-step-failure
- name: command_step
run: echo hello
- name: artifact_step
uses: connect/download-artifact
with:
registry: account1
artifactory-path: local-repo/file.txt
device-path: /tmp
on-failure:
trigger-revert: this-step-failure
revert-all-files: false
on:
workflow-dispatch:
inputs:
input-1-name: {}
input-2-name: {}
input-3-name: {}
GET /api/v2/{project_key}/devices HTTP/1.1
Host: api.connect.jfrog.io
Authorization: Bearer YOUR_SECRET_TOKEN
Accept: */*
{
  "address": "",
  "agent_version": "6.2",
  "cpu_usage": null,
  "current_disk_usage": 0,
  "description": "",
  "device_ip": null,
  "device_name": "device1",
  "device_status": "online",
  "device_uuid": "d-c06c-a10f",
  "disk_size": 0,
  "group_name": "group1",
  "is_update_trigger_set": false,
  "last_keepalive": "2025-06-09T14:10:44Z",
  "lat": null,
  "lng": null,
  "project": "proj_name",
  "ram_usage": null,
  "registered_date": "2025-06-09T14:10:44Z",
  "tags": {
    "message": "",
    "names": [
      "tag_1",
      "tag_2",
      "tag_3"
    ]
  }
}{
"address": "270 E Caribbean Dr, Sunnyvale, CA 94089, USA",
"agent_version": "6.0",
"apps": [
{
"app_name": "app name",
"version": "1.0"
}
],
"cpu_usage": 1,
"current_disk_usage": 3282,
"description": "",
"device_ip": "18.209.245.178",
"device_name": "zzzzz",
"device_status": "offline",
"device_uuid": "d-abfa-d82b",
"disk_size": 214735,
"group_name": "Tel-Aviv",
"is_update_trigger_set": false,
"last_keepalive": "2022-11-29 14:23:44",
"lat": 37.4157324,
"lng": -122.0138817,
"mac_address": [
"02:1f:fa:3c:7b:11",
"02:42:81:09:b2:42"
],
"project": "demo",
"ram_usage": 11,
"registered_date": "2022-11-03 12:48:23",
"tags": [
"tag1",
"tag2",
"tag3"
],
"updates": [
{
"apps_updated": [],
"comment": "",
"deployment_finish_time": "",
"deployment_schedule_time": "2024-06-25 15:05:17",
"deployment_start_time": "",
"deployment_status": "pending",
"deployment_type": "manual",
"flow_name": "conan-flow"
},
{
"apps_updated": [],
"comment": "",
"deployment_finish_time": "",
"deployment_schedule_time": "2024-06-20 15:33:58",
"deployment_start_time": "",
"deployment_status": "pending",
"deployment_type": "manual",
"flow_name": "my echo"
},
{
"apps_updated": [],
"comment": "",
"deployment_finish_time": "",
"deployment_schedule_time": "2024-05-30 09:43:57",
"deployment_start_time": "",
"deployment_status": "pending",
"deployment_type": "manual",
"flow_name": "update with file"
},
{
"apps_updated": [],
"comment": "",
"deployment_finish_time": "",
"deployment_schedule_time": "2024-05-02 15:41:22",
"deployment_start_time": "",
"deployment_status": "pending",
"deployment_type": "manual",
"flow_name": "Try Verification v2"
},
{
"apps_updated": [],
"comment": "",
"deployment_finish_time": "",
"deployment_schedule_time": "2024-05-02 08:44:21",
"deployment_start_time": "",
"deployment_status": "pending",
"deployment_type": "manual",
"flow_name": "Try Verification v2"
}
]
}PATCH /api/v2/{project_key}/devices/{device_uuid} HTTP/1.1
Host: api.connect.jfrog.io
Content-Type: application/json
Accept: */*
Content-Length: 67
{
"operations": [
{
"op": "add",
"path": "tags",
"value": [
"tag1",
"tag2"
]
}
]
}{
"address": "44091 Ashburn Shopping Plz, Ashburn, VA 20147, USA",
"apps": [],
"cpu_usage": 1,
"current_disk_usage": 1124,
"description": "",
"device_ip": "54.145.235.216",
"device_name": "New Device",
"device_status": "online",
"device_uuid": "d-c06c-a10f",
"disk_size": 8218,
"group_name": "Production",
"is_update_trigger_set": false,
"last_keepalive": "2024-05-02 07:12:57",
"lat": 39.0432152,
"lng": -77.4745442,
"mac_address": [
"0e:fb:e1:d0:69:09"
],
"project": "demo",
"ram_usage": 7,
"registered_date": "2024-05-01 08:41:16",
"tags": [
"arnold the king",
"john_tag_test",
"jeff the king",
"mike_tag_test"
],
"updates": [],
"agent_version": "6.2"
}{
"message": "Device moved successfully"
}You will need to get an access token from the Connect web UI to use the Connect API v2. The v1 token will not work for v2.
Important: For security reasons, the new token generated by Connect will not be stored. Ensure that you copy the token and save it in a safe place.
The fleet key of the relevant fleet in the account. An account can have multiple fleets (formerly called projects). If you don't know the fleet key, you can find it in the Fleet Settings of the web UI.
The UUID of the device you want to connect to.
The port you want to forward. This can be any port number. For example, use 22 for a secure SSH connection to your device.
The port will be accessible only from this IP address. If you do not use this parameter, the allowed IP will be your current IP address.
Created
Created
POST /api/v2/{project_key}/port_tunnel HTTP/1.1
Host: api.connect.jfrog.io
Authorization: Bearer YOUR_SECRET_TOKEN
Content-Type: application/json
Accept: */*
Content-Length: 62

{
  "device_uuid": "d-c8b9-02aa",
  "port": 22,
  "allowed_ip": "1.1.1.1"
}{
"port_tunnel_id": "7d7a7462-cc5b-4f9a-b678-d3288475de02",
"server_address": "d-c8b9-02aa-crwapf2u2ia.forwarding.connect.jfrog.io",
"server_port": 44187
}