Plan the big picture, your software update strategy using JFrog Connect.
Once you learn some of the basics about JFrog Connect, such as registering a device, creating an update flow, and deploying a software version, it’s time to think about the big picture.
How will you organize your fleet, create re-usable workflows, and use the many tools in Connect to manage your fleet efficiently over the long term?
In this chapter, we introduce some key concepts and walk you through an idealized use case that does not go into all the numerous variations possible. You can then use this as a model for building your own strategy according to your specific business needs.
Learn some of the basic software update concepts.
JFrog Connect was designed by and for developers of IoT and edge devices in a wide range of industries.
A basic assumption from the start was that the IoT and edge devices could be in complex network environments with conditions such as:
Limited connectivity
Located behind firewalls without a public IP address
IT staff not available at remote sites
Devices deployed outside of the data center security perimeter
Many different hardware platforms and configurations
is built with a robust client-server architecture scaling to support tens of thousands of edge devices.
The client consists of the running on the edge or IoT device. Connect Agent communicates with the outside world (i.e., the Connect server) as a client only, without using any open ports or listening servers.
Connect Agent periodically sends heartbeats containing status information about the device including CPU, RAM, and disk usage and information about any processes being monitored.
The Connect server manages all communications to and from the Connect Agents and performs a number of functions including the following:
Receives regular status and monitoring messages from the clients
Controls the software update process and all interactions with the agents including remote control and access, obtaining device details, and fetching files requested
Processes all interactions between the user interface and the Connect Agents
The Connect server can work in a cloud SaaS mode or in self-hosted mode. Unless specified otherwise, the user documentation describes the cloud SaaS mode. If you have questions specifically about the self-hosted mode, please and we will be happy to discuss them with you.
The Connect system supports a number of infrastructure configurations.
This includes a Connect account under a multi-tenant infrastructure, integrated with a single-tenant Artifactory for your software supply chain needs.
In this arrangement, the complete environment is isolated, with both Connect and Artifactory hosted on one of the major cloud providers.
This is an isolated, air-gapped environment, with Connect and Artifactory for setups that require separation from the outside world.
The JFrog Connect console is a web UI that enables you full visibility and control of your devices. Using the console you can register devices, manage your fleet, check device status and details, create and deploy OTA updates, open a remote access session with an individual device, and take advantage of the full feature set described in the .
The Connect web UI is supported in the Google Chrome browser only.
JFrog Connect provides a REST API enabling programmatic access and control, which is ideal for managing large fleets of devices. The enables you to embed the JFrog Connect functionality into your CI/CD pipeline and deploy OTA updates as part of new application releases. You can also use the Connect API to create a custom dashboard or integrate JFrog Connect information with an existing dashboard.
JFrog Connect adheres to industry standards and complies with relevant security and safety regulations to ensure the security of your data. Connect is also dedicated to enabling you to comply with your own internal security policies.
Among its security features, Connect supports JSON Web Tokens (JWTs) and uses them to support secure interactions between a Connect project and the Connect Agent on a device.
The Connect servers, databases, storage, and cloud environment are all based on AWS products with AES-256 encryption and live zone fallback combined with an extra layer of security, a separate Amazon Virtual Private Cloud (Amazon VPC).
JFrog Connect is part of the . Connect is fully integrated with the rest of the JFrog supply chain, empowering developers to automate DevSecOps activities with best practices and continuous governance from developer to device.
Connect supports configuration with . Artifactory Edge (an "edge node") is an edition of JFrog Artifactory whose available features have been customized to serve the primary purpose of distributing software to a runtime such as a data center.
Learn more about the .
.
JFrog Connect overview and user documentation
JFrog Connect, part of the JFrog Platform, simplifies and secures the entire IoT development lifecycle. It unifies industry-leading artifact management, security, and enterprise-grade scalability for efficient software deployments to your IoT fleets. Manage your software supply chain, from developer to device, with a single platform.
Connect is part of the JFrog Platform, providing edge and IoT management at scale. Native integration with JFrog Artifactory ensures efficient and trusted secure software releases by incorporating modern DevOps governance into the development cycle. Connect safeguards your deployments through integration with JFrog Security, which provides comprehensive vulnerability scanning of artifacts before they are deployed.
Connect transforms the way you deploy software to edge devices. to thousands of devices using commands, scripts, artifacts, files, or containers. This automated approach, along with Connect’s REST API, significantly reduces deployment times from days to hours while maintaining security and reliability. In case of deployment issues, Connect's configurable mechanisms ensure stability and quick recovery.
JFrog Artifactory, the native artifact manager for Connect, is recognized as a trusted source of artifacts. To provide another level of confidence in the supply chain, Connect utilizes an artifact scoping mechanism, ensuring only approved, user-defined artifacts within a project can be deployed to devices. The trust chain extends end-to-end, with communication between server and device secured through industry-standard .
Have a look at the high-level , including Connect Agent, network, and security information.
to get your JFrog Connect account and get started.
You can tag each deployment with an application name and version. This is a convenient way to manage software deployed and ensure the devices are up-to-date with the latest versions and security fixes.
Troubleshooting becomes effortless with Connect's remote access tools. Access and control devices from anywhere using the Terminal, Port Tunnel, File Fetch, and Remote Command features. Connect's security architecture enables access to devices behind firewalls or private networks while maintaining enterprise-grade security controls.
Connect provides comprehensive visibility into your device fleet through monitoring of device resources, including CPU, RAM, and disk usage. The platform tracks application status and device state, generating automated alerts to prevent issues before they escalate. Connect also supports custom data monitoring. For example, if your device produces data about temperature or humidity and sends it to Connect using the API, then Connect can monitor it according to thresholds you set.
Connect provides several tools to organize your fleet effectively. The flexible tagging system enables custom categorization, while project-level organization provides clear separation of devices between different deployment environments.
Connect supports a wide range of operating systems – including common Linux distributions (e.g., Yocto, Debian, Ubuntu, and Raspberry Pi OS) – and other OSs such as Windows. Connect also works with popular hardware platforms such as NVIDIA Jetson, BeagleBone, and Raspberry Pi.

JFrog Connect Agent is a lightweight software service that keeps your devices connected 24/7. When you register a device with JFrog Connect, the Connect Agent is installed on the device.
Connect Agent was designed with a few key points in mind to give you a simple and secure experience:
Lightweight - Consumes about 4 MB of disk space and about 11 MB of RAM.
Always on - The Connect Agent service is always running in the background. Even when there is no Internet connection, the agent will always keep the device accessible remotely when the connection returns.
Zero dependencies - Designed to run like an add-on, i.e., no additional installations are required to make it work.
Smart network behavior - Only communicates as a client, using port 443 with the Connect Server. No open network ports or listening servers are required on the edge and IoT devices.
Connect Agent sends regular heartbeat messages to the Server. The messages include updates on your edge device’s up/down status, CPU, RAM, and disk usage. The heartbeat messages also provide updates on any of the processes and custom data being monitored.
In addition, the Connect Agent:
Facilitates the software updates to the edge device according to the blocks defined in the Update Flows
Enables remote access and control commands to the device
Enables creation and configuration of firewall rules on the devices
Retrieves logs and any kind of data file stored on the device according to your request
The Connect Agent is project linked. This allows agents in different projects to have different configuration settings such as communication cycle and user access parameters. If you have multiple projects configured and you register a new agent, you will need to ensure that you associate the new agent with the intended project.
An agent acts as standalone software with regard to installation. If you re-install the same version of an agent on the same device, the new agent will have a different token and will be counted as a new device. In addition, the old device is not removed from the database in the Connect Server and appears in offline state in the web UI until you delete it.
Connect Agent is designed for easy installation and compatibility on any Linux-based operating system and is suitable for use on a variety of hardware architectures including SOC, SOM, and SBC, as long as the OS is Linux-based.
The Connect Agent is compatible with popular hardware platforms such as NVIDIA Jetson, BeagleBone, and Raspberry Pi, and will work with any hardware platform meeting the following specifications:
Minimum total device resources:
30MB RAM
30MB Disk space
Core Architecture:
ARM:
ARMv5, ARMv6, ARMv7, ARMv8 - 32 and 64 bit
Cortex-A required for all ARM processors
Intel: x86 and x86_64
You can use a wide range of operating systems, including the following Unix-based OSs:
Yocto-based build
Ubuntu
Debian
Centos
Systemd/SysV (init.d) service manager must be installed on the client device.
If the ssh-client is not already on the device, the client will be installed by default when you download Connect Agent to the device.
The device must be configured to allow Write permission to the Connect Agent.
From time to time a new version of the Connect Agent will become available. The Connect Agent updates ensure that IoT devices are running the latest software and are able to communicate with the JFrog platform effectively.
The new agent version is not deployed automatically. When a new version is available, you can initiate an OTA update process at your convenience to update the agents on your connected devices. The update process takes place in the following stages:
Agent Version Management: Connect keeps track of the versions of the agents running on each device and compares them to the latest version available.
Notification: When a new version of the agent is available, a notification appears in the web UI and a release note will be available.
Initiation: In the Connect Agent Update page, you initiate the OTA update process.
JFrog Connect Agent versions 7.0 and higher employ a trust mechanism that uses JSON Web Tokens (JWT) for secure interactions between the agent and a Connect project.
Learn more about JFrog Connect’s .
Raspberry Pi OS
Arch
Custom Debian build
Post-update Verification: After the update process completes, Connect can verify that the new version of the agent is running (online/offline) on each device.
This page describes the major steps in updating your IoT software. Once you are set up with the JFrog Connect environment, updating software on your IoT devices becomes a simple and reliable process.
To complete the update process described on this page, you will need the following:
Your fleet of IoT devices is registered in JFrog Connect as described in Register Devices at Scale.
Docker and installed.
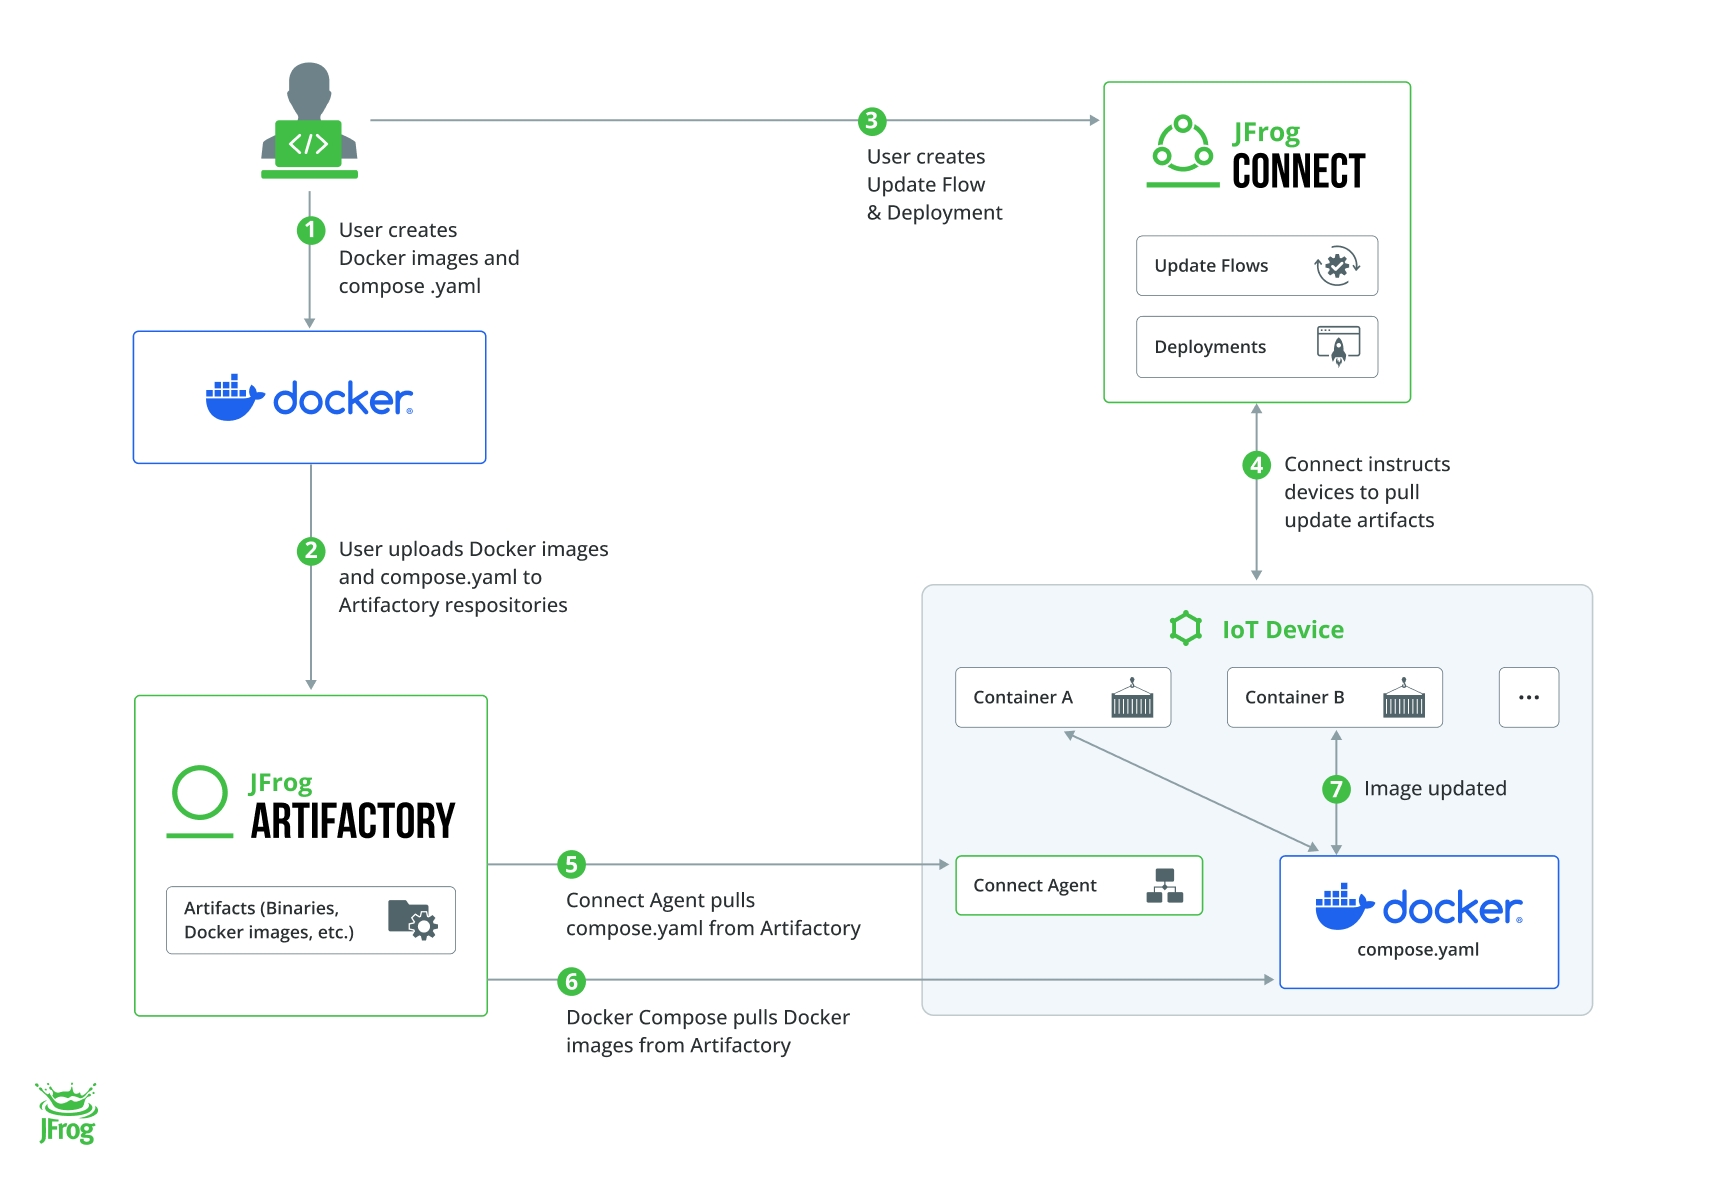
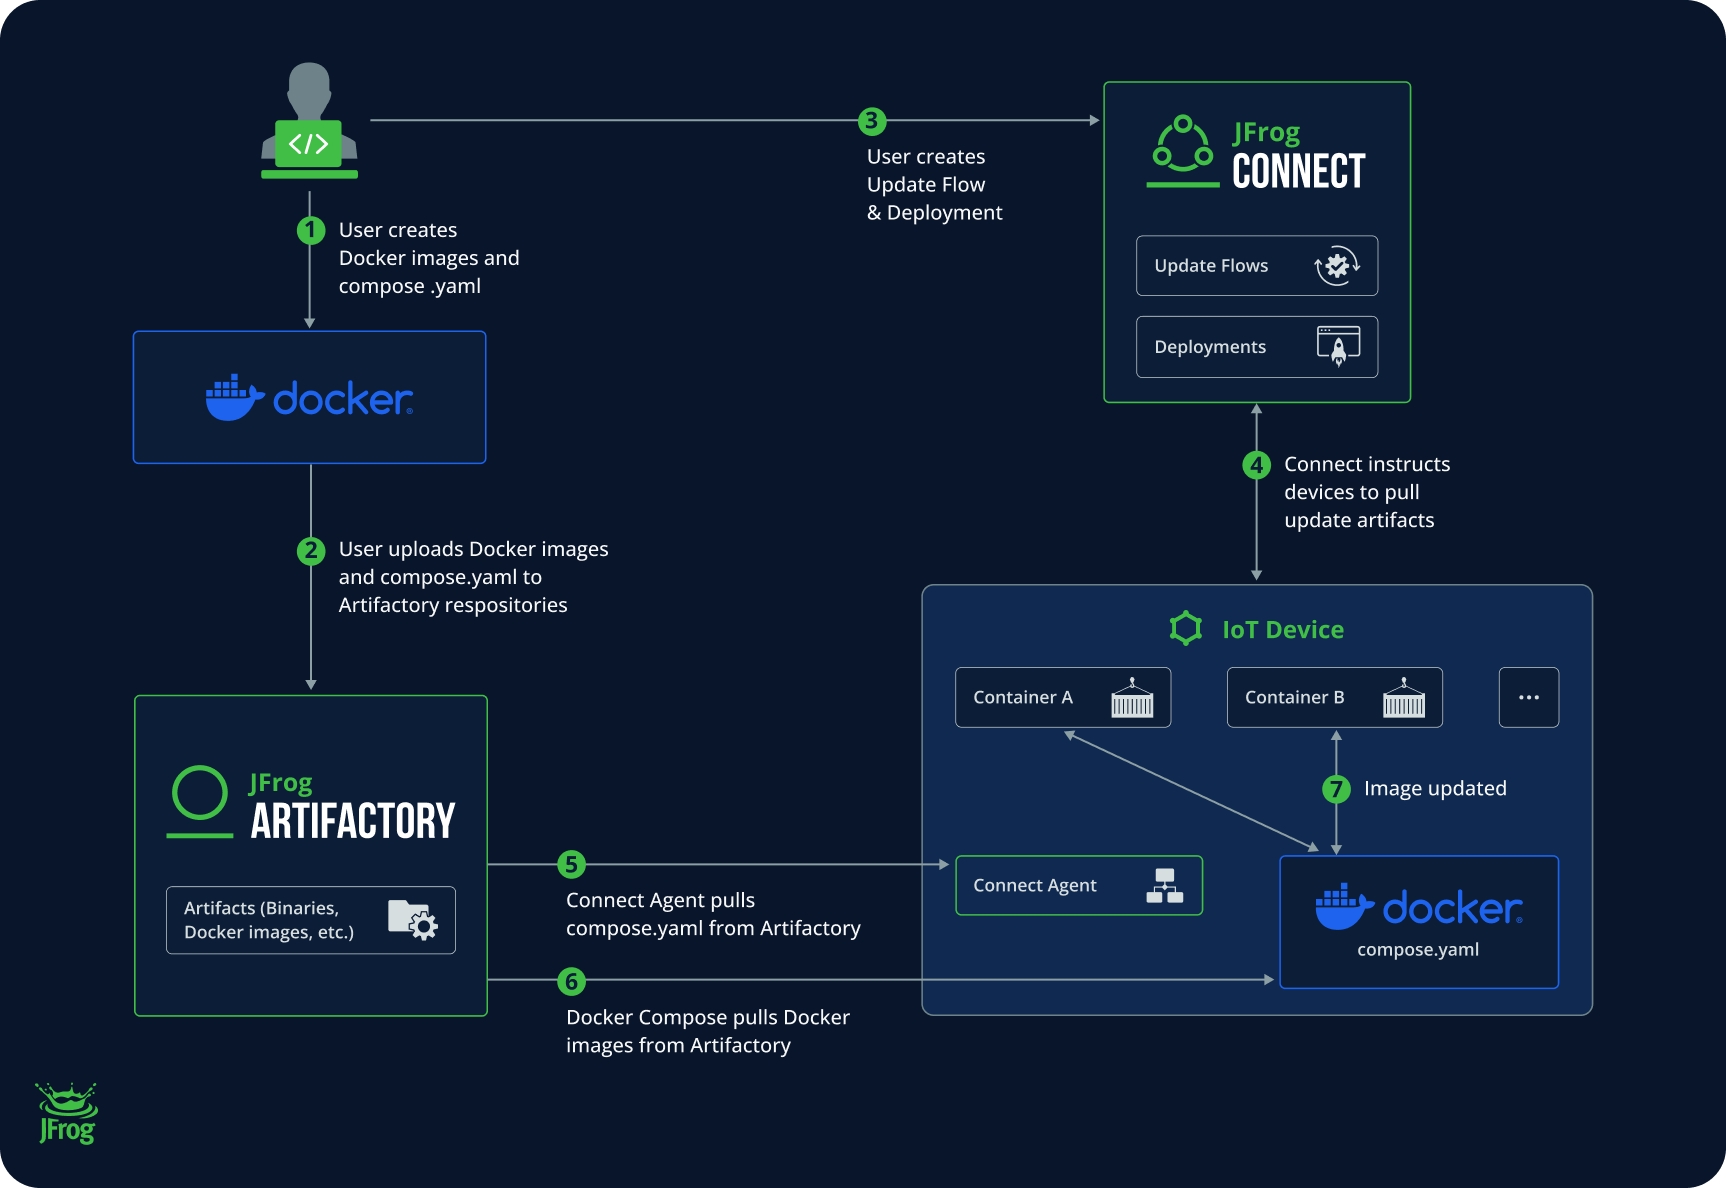
Connect has created a process for updating software in your IoT devices that is simple and repeatable. The illustration below provides an overview of the process and the actors involved. The stages in the process are numbered to show the order of events, and each stage is described in detail below.
The stages described in detail below correspond to the stages indicated in the illustration.
You use Docker to create your container images. You will also use Docker Compose to create a compose.yaml file.
We recommend using Docker Compose, whether your device software requires one or multiple containers. With Docker Compose, you use a YAML file to configure your application's services. This enables you to easily manage the deployment of numerous microservices that may require numerous containers on the device. (Your specification in the YAML can include one or any number of Docker images to pull.)
For more information about using Docker Compose with Connect, see .
You upload your container images and compose.yaml file to repositories in Artifactory. (You upload the compose.yaml file to a generic repository and the Docker image to a Docker registry.) For more information, see Docker Compose Best Practice.
Your Artifactory repositories will serve as your central point of truth for all of the binaries and artifacts that need to be included in a release. Files you keep here might include container images, application packages, installers, libraries, and configuration files. Over time you will accumulate additional versions of the binaries, and they will all be available to you in Artifactory.
Using Connect, you create an Update Flow consisting of one or more actions. Use either Release Bundle or Deploy Docker as one of your actions. We recommend the following:
Whether you use the Release Bundle or the Deploy Docker action block, choose Docker Compose in the configuration.
Whether you deliver one or multiple containers, choose Docker Compose.
This will give you the consistency of using the same methodology and workflow all the time. For detailed examples of building the Deploy Docker and Release Bundle actions, see .
We also recommend parameterizing any of the fields in the update flow that will likely be different from one deployment to the next. You will fill in the values when the deployment actually runs. This is another practice that enables reuse of the update flow.
Once you have created a good update flow, you can reuse it tens or hundreds of times for subsequent software deployments.
After creating the update flow, you implement it by creating a Deployment. A deployment is an object that associates the update flow with a group of devices and defines the triggering for the update to take place.
When you create a deployment, you will be prompted to enter the values for the parameters you defined in the update flow. For example,
For a detailed example of building the deployment, see .
By default, when you save the deployment or when Connect receives the Deploy Update API command, Connect instructs the device to request the update artifacts. However, you can also schedule a later time for the deployment to run. This is ideal for updating the software at times when usage is low or other risk factors are low.
The Connect Agent in the device receives the Deployment and uses the path and filename of the Docker Compose YAML to pull the file from Artifactory.
The Docker Compose YAML file received in the device uses the filename(s) and path(s) of the Docker image(s) to pull one or multiple Docker images from Artifactory.
The Docker Compose in the device updates the Docker images on the device with the new ones it received from Artifactory.
When you need to update the software again, you will repeat all the stages in the process above with one major exception: you will not need to create a new Update Workflow. Once you have built a single, robust update workflow and run a successful deployment, you can use the same workflow to deliver:
Later versions of the Docker images (i.e., in the new deployment, change the Artifactory path value for the Docker Compose YAML)
Different Docker images containing different microservices (i.e., in the new deployment, use a different Docker Compose YAML and change the Artifactory path value to pull the new YAML)
The same Docker images to different groups of devices (i.e., in the new deployment, change the Group(s) to which the updates are delivered)
Learn how to that you will use over and over again.
This page describes the major objectives of the JFrog Connect methodology for deploying software updates and describes key concepts for using Connect.
Once you learn some of the basics about JFrog Connect, such as registering one or more devices, creating a single update workflow, and running a deployment, we would like to discuss some concepts and best practices that will help you enjoy the power and simplicity of JFrog Connect for maintaining a large fleet over the long term.
It is one thing to build a single update workflow and use it to deploy software to a few devices, but it is worth putting some thought and planning into how you will build and use workflows for maintaining your fleet over time. The goals of the methodology we recommend can be summarized in a few key points.
It is important to build an update mechanism that reduces chances of error and helps you get the most out of JFrog Connect capabilities. Just one example of this is using the On Failure and Rollback features. Once you specify what should happen when an action in the workflow fails, and you specify when and what type of rollback should occur, then you will know what the outcome of an action will be no matter what happens.
Another aspect of ensuring robustness is in building update flows that we know how to roll back. For example, if you run many commands that do different things like replacing packages on the OS, it might be very hard to build a proper rollback mechanism that turns everything back 100%, as you can't be sure exactly where the update failed and what specifically was done. Therefore, you should design and build flows that are highly controlled, so that in any case of failure you have a straightforward procedure for safe rollback.
While the JFrog Connect options enable you practically infinite possibilities to build your workflow and your update flows specifically, our objective is to recommend practices that help you build a minimal, yet flexible set of workflows that cover the update tasks for your fleet.
Build a process that you can repeat many times over. To gain confidence and consistency in your deployment method, you will want to create update flows that you can use over and over again. For example, you will need to know that you are performing exactly the same actions in your test environment as in production, and in production you may need to use exactly the same flows from one group of devices as in another. We’ll recommend practices for obtaining this kind of consistency so that you can have complete confidence in your deployments.
Think about how you will need to perform your software updates a few months or even a few years down the road so that you can start building your update flows the right way. This could include naming conventions for versions, workflows, and deployments and considerations such as containerization and management of binaries.
The ideal update flow will involve choosing one or more Docker containers that reside on an Artifactory repository, defining some parameters for dynamic deployments, and choosing an app version. To help you understand the process more deeply, the key concepts are described below.
Using containerized applications and managing them with is an important piece in the overall chain for deploying updates to your IoT devices.
While there are numerous advantages to using that are beyond the scope of this page, we recommend that you use containers for deploying software with JFrog Connect for the simple reason that you will have far fewer binary artifacts to keep track of. Inside the container are all the necessary executables, binary code, libraries, and configuration files required to run the application, and the application will run the same, regardless of where it is deployed.
We recommend using Docker Compose, whether your device software requires one or multiple containers. With Docker Compose, you use a YAML file to configure your application's services. For example, you specify which Docker images to pull from the repository, including one or any number of images. This enables you to easily manage the deployment of containers on the device.
When you need to deploy software updates to hundreds or perhaps hundreds of thousands of devices, an important part of your delivery pipeline is the . By using this one common tool to govern all of your binaries and release artifacts, your organization can align to the same workflows and best practices that will assure quality and accelerate release velocity.
While Connect can work with several binary repositories, we recommend JFrog Artifactory as the repository for large scale, enterprise class software deliveries. Artifactory:
Is fully integrated with Connect as part of the . This means that you can upload a Docker Compose file to Artifactory, then easily select the file in Connect when creating an update flow.
Offers a comprehensive solution for managing and distributing software binaries and artifacts, such as container images, application packages and installers, libraries, configuration files, and virtually any other type of binary data that is produced during the software development and delivery process.
Supports all major package formats including Docker, Alpine, Maven, Gradle, Cargo, Conda, Conan, Debian, Go, Helm, Vagrant, YUM, P2, Ivy, NuGet, PHP, NPM, RubyGems, PyPI, Bower, CocoaPods, GitLFS, Opkg, SBT, Swift, Terraform and others.
When you set up an update flow, you can parameterize any of the data fields. This enables you to reuse flows for multiple deployments while entering the values for the parameterized fields when you run the deployment.
For example, you build an update flow that uses Docker images. You need the flow to run the same action blocks in every deployment, but you intend to use a different Docker Compose configuration file for each deployment. You would make the path to this file a parameter that is filled in dynamically for each deployment. Connect would then pick up the correct configuration file for each deployment by looking in the path entered dynamically in each deployment.
You could take this a step further and use the Connect API to update your parameters upon deployment. This would be the recommended method to run automated deployments updating software for the entire fleet.
The concept provides a simple yet powerful way to keep track of software running in your fleet. By assigning App Names and App Versions to your deployments, you can monitor and know at any time which code is running on each of your devices.
An App is simply a metadata name that you create for a deployment. When you deploy an update flow, you associate the app name and an app version with the deployment (e.g., one or more microservices or containers being deployed together) and the devices included in that deployment. In each deployment, you can update the app version as needed.
Once you have completed a few deployments, you can then use app and app version as a method of filtering devices for purposes of monitoring or performing further operations on those devices.
Learn about the recommended .
JFrog Platform integration with Connect makes IoT devices first-class citizens in a DevOps pipeline, ensuring speed, reliability, and security of IoT software updates with device management at scale.
At the heart of the JFrog Platform is JFrog Artifactory, the industry standard for universal binary repository managers. Artifactory provides end-to-end automation and management of binaries and artifacts throughout the application delivery and deployment process.
When you create a account, a JFrog Platform account including Artifactory is also created for you. This enables you to easily upload binaries to an Artifactory repository and automatically pull artifacts for deployment to your edge devices.
Connect creates two repositories in your new Artifactory account:
Has a flexible architecture that can work in cloud-native, self-hosted, and hybrid, environments.
Connect-default-docker
Connect-default-generic
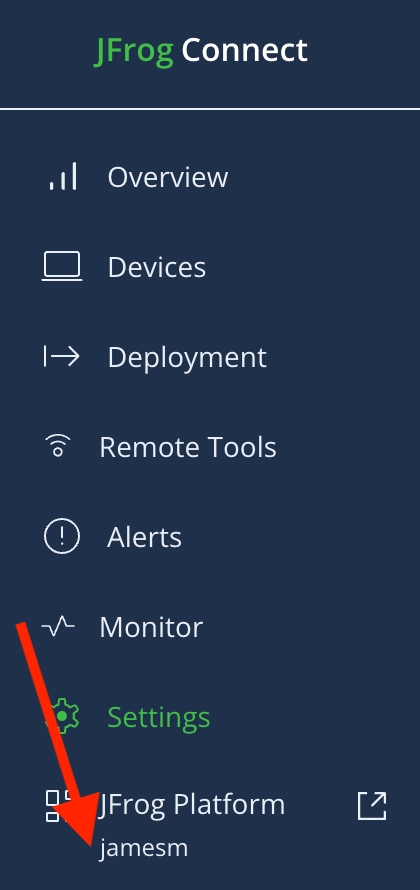
You can find your JFrog Platform instance domain at the bottom of the left navigation bar.
If you have registered to Connect before April 2022, do the following to find the JFrog Platform instance domain:
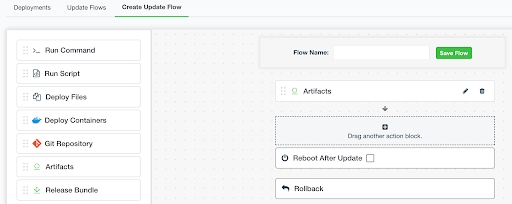
In the left sidebar, go to Updates and click the Create Update Flow tab.
Ensure the Connect Agent is 6.0.
Drag and drop the Artifacts action block and click it.
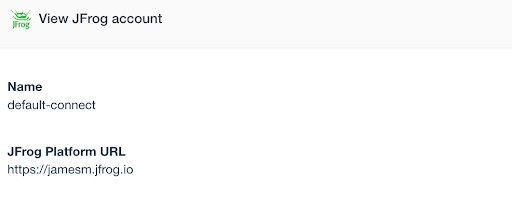
Ensure that the JFrog Account field is set to default-connect and click the eye to the right of the field. The instance domain is under JFrog Platform URL.
When you use Connect as an integral part of the full JFrog Platform, you can take advantage of JFrog Xray, the universal software composition analysis (SCA) solution. Xray proactively identifies open-source vulnerabilities and license compliance violations before they manifest in production devices.
Regardless of the default Artifactory instance, you can configure your Connect account to work with a registry other than Artifactory.
To set up Connect to work with a different registry, see Registry.